Archangle:SleepyHead Install
Contents
- 1 How to Install SleepyHead on Windows Machines
- 1.1 Figure out Which Version of Windows You Have
- 1.2 Go to the Download Web Page
- 1.3 Choose the 32 or 64 bit Version and Download
- 1.4 Choose Where to Save the File
- 1.5 Open the Directory Where you Saved the File
- 1.6 Extract (Unzip) the File
- 1.7 Open the Directory you Just Created
- 1.8 Open the SleepyHead Files Directory
- 1.9 Desktop Shortcut
How to Install SleepyHead on Windows Machines
These notes are for installation on Windows 7. If you have a Windows 8 machine, there are probably differences in how you do the install.
I'm using Firefox as my web browser. Internet Explorer, Chrome, or other browsers may be slightly different.
Figure out Which Version of Windows You Have
You need to know whether it is 32 bit or 64 bit. Unfortunately, Microsoft doesn't make this easy.
-If you can't figure out which version of windows you have, use the 32 bit version.
Depending on your version of Windows, the following should work.
Start -> Control Panel -> Computer -> System Type
System type will say 32 bit or 64 bit.
Go to the Download Web Page
Choose the 32 or 64 bit Version and Download
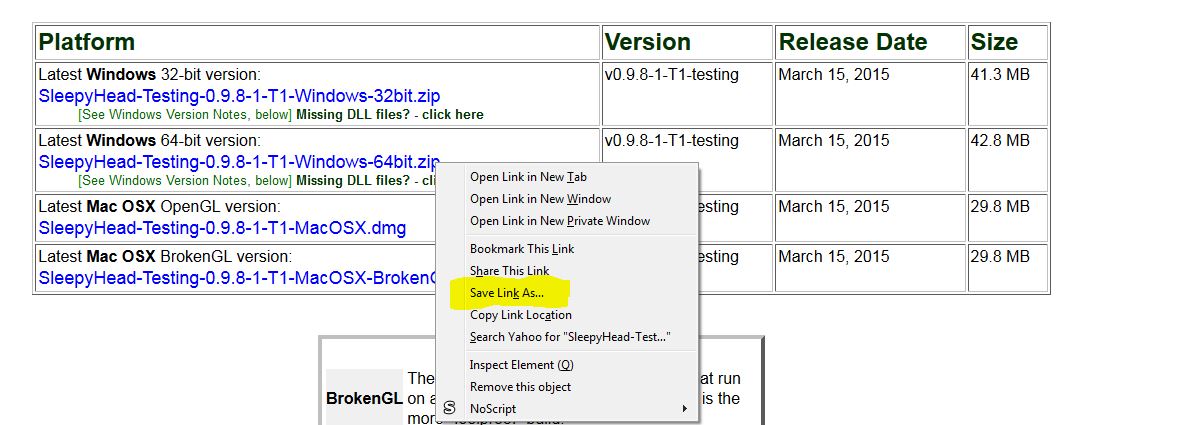
In this example, I choose the 64 bit Windows Version.
Right click on SleepyHead-Testing-0.9.8-1-T1-Windows-64bit.zip to bring up the menu.
Click on Save Link As...
If you are using the Chrome browser, you may get a "warning message" stating it is "not commonly downloaded and could be dangerous". Ignore this message.
This is a generic warning from Chrome about downloading "unknown" zip files containing executable files. Of course, SleepyHead is neither a virus nor malware, but it's a good idea to run your own antivirus scan against this or any other executable files that you download from any source. If you see this Chrome message it will show a "discard" button. If you wish to use the downloaded file, simply change that "discard" option by clicking on the drop-down menu (down arrow) and select "keep" this file.
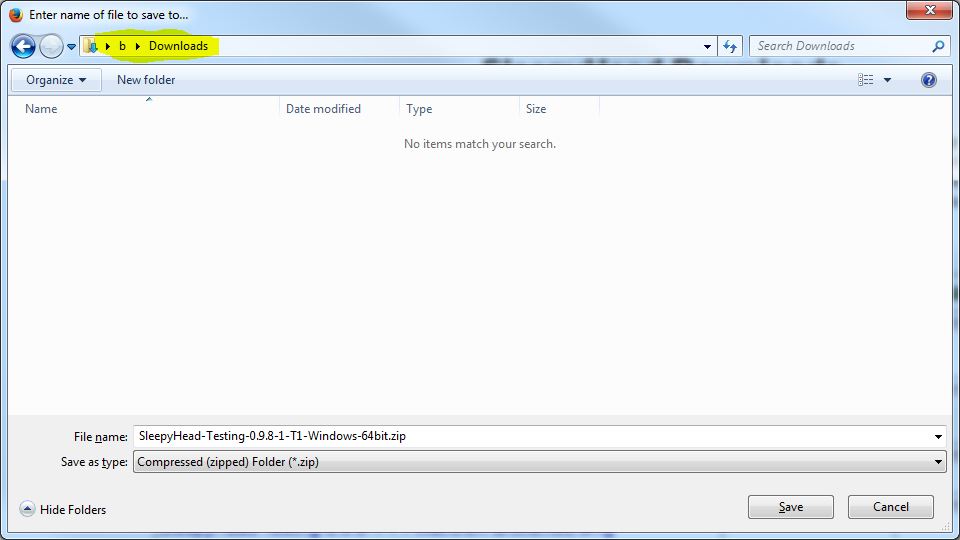
Choose Where to Save the File
In this case, I just let it save the file to the "Downloads" directory.
Open the Directory Where you Saved the File
Try to remember where you saved the file and open that directory in Windows.
If you use Firefox, you can select Tools -> Downloads and do "Open Containing Folder" on the file you just saved.
Extract (Unzip) the File
The file you downloaded is a ZIP file containing a number of other files. You need to unzip the file in order to use it.
On most versions of Windows, Windows will extract the files for you. Right click on the file you just downloaded. (SleepyHead-Testing-0.9.8-1-T1-Windows-64bit.zip in this example.)
Select "Extract All." 'NOTE: "Open" will NOT work. You MUST use "Extract All."
'

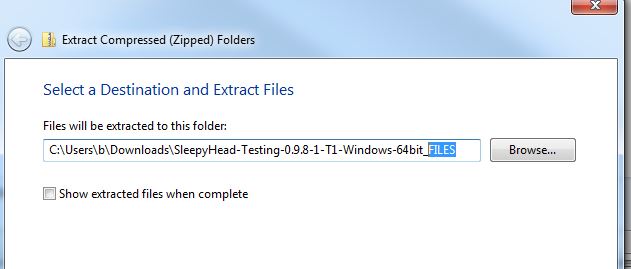
You will be given a choice of where to extract the file.
You can put this wherever you want the SleepyHead program to be stored. At a minimum, I suggest you change the name so it's clear what is the directory and what is the .zip file. I just added "FILES" at the end of directory name like this:
Open the Directory you Just Created
Inside that directory will be the directory with the SleepyHead files. You can move it somewhere else if you want to, or just use it where it is. In this case, it's called "SleepyHead-Testing-T1-Windows-64bit".
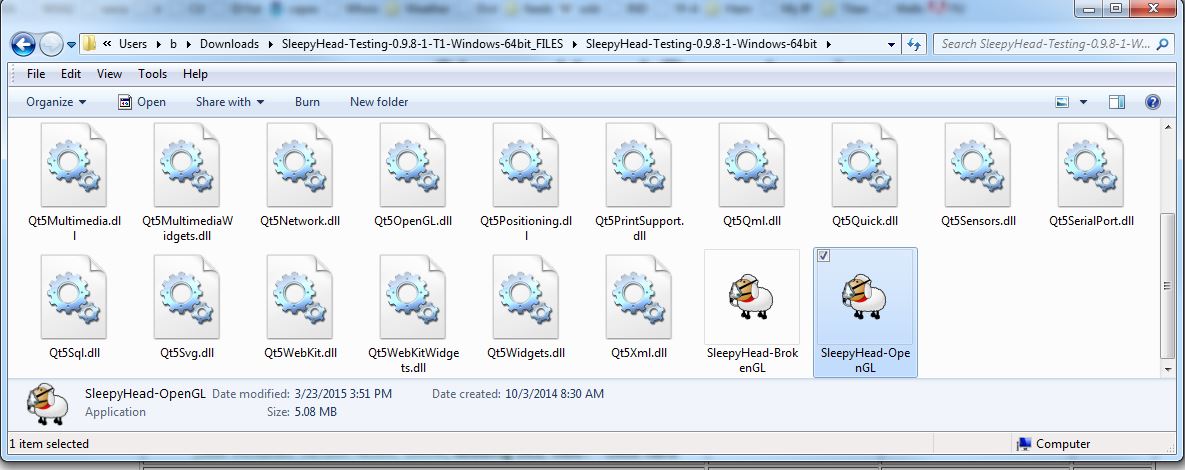
Open the SleepyHead Files Directory
The "OpenGL" version is the best, but it may fail to work on some older PC's with "broken" OpenGL drivers or hardware.
Try the "OpenGL" version and see if it works. It may give you an error code about OpenGL/BrokenGL. If so, or if it just fails, try the BrokenGL version of SleepyHead.
Desktop Shortcut
You can optionally create a desktop shortcut for SleepyHead.
Select the executable you used in the previous step, left click it once, then right click to get a menu.
Select Copy.
Go to the Desktop. Right click on the background and select "Paste Shortcut." DON'T forget the SHORTCUT part.
You should end up with a desktop icon.
You can now optionally rename the icon, or copy it to your start menu or taskbar.

Donate to Apnea Board


